ESP32とAmazon Alexaを連携して物理スイッチを制御する
はじめに
前回の記事でESP32をAmazon Alexa(以下、Alexa)のスマートホームのデバイスに登録する方法をご紹介しました。
記事内では動作確認のためにLEDの点灯・消灯を制御していましたが、SwitchBotのような物理スイッチの制御を実現してみましたのでご紹介します。

Switch Bot ボタンを押してくれる超小型指ロボット (ワイヤレス / スイッチボット)
- 出版社/メーカー: Switch Bot / Glappy
- メディア: ホーム&キッチン
- この商品を含むブログを見る
完成品
AlexaアプリからESP32に接続されたサーボモータを制御しています。また、Amazon Echoに話しかけても動作可能です。
見た目は残念ですが、物理スイッチの制御を実現しています。
また、通常のように物理スイッチを指で押すことも可能となっています。
SwitchBotは手元にないけど、物理スイッチを制御したいという願望を無理矢理叶えたものがこちらになります。 pic.twitter.com/ylORdQt96h
— クラクス (@kuracux) 2018年9月14日
準備物

Echo 第2世代 - スマートスピーカー with Alexa、サンドストーン
- 出版社/メーカー: Amazon
- 発売日: 2018/04/03
- メディア: エレクトロニクス
- この商品を含むブログ (3件) を見る
- Alexaアプリ
- ESP32-DevKitC
- ブレッドボードとジャンパーワイヤ(オス-オス)
- サーボモータ(SG92R)
前提
前回の記事を参考にESP32とAlexaとの連携がすでに済んでいる方を対象としています。
1 スケッチ例
Arduino IDEから下記のスケッチを書き込みます。前回の記事のスケッチをもとに作成しています。
#include <Arduino.h>
#include <WiFi.h>
#include "fauxmoESP.h"
#define SERIAL_BAUDRATE                 115200
#define SERVO                           15

fauxmoESP fauxmo;

char ssid[] = "";
char password[] = "";
bool inputState = true; //オンオフ記録用

// -----------------------------------------------------------------------------
// Wifi
// -----------------------------------------------------------------------------

void wifiSetup() {

    // Set WIFI module to STA mode
    WiFi.mode(WIFI_STA);

    // Connect
    Serial.printf("[WIFI] Connecting to %s ",ssid);
    WiFi.begin(ssid, password);

    // Wait
    while (WiFi.status() != WL_CONNECTED) {
        Serial.print(".");
        delay(100);
    }
    Serial.println();

    // Connected!
    Serial.printf("[WIFI] STATION Mode, SSID: %s, IP address: %s\n", WiFi.SSID().c_str(), WiFi.localIP().toString().c_str());

}

void setup() {

    // Init serial port and clean garbage
    Serial.begin(SERIAL_BAUDRATE);
    Serial.println();
    Serial.println();

    // Wifi
    wifiSetup();

    // You have to call enable(true) once you have a WiFi connection
    // You can enable or disable the library at any moment
    // Disabling it will prevent the devices from being discovered and switched
    fauxmo.enable(true);

    // Add virtual devices
    fauxmo.addDevice("照明");

    // fauxmoESP 2.0.0 has changed the callback signature to add the device_id,
    // this way it's easier to match devices to action without having to compare strings.
    fauxmo.onSetState([](unsigned char device_id, const char * device_name, bool state) {
        Serial.printf("[MAIN] Device #%d (%s) state: %s\n", device_id, device_name, state ? "ON" : "OFF");
        inputState = state;
        if(inputState){
          //オンのときのサーボの挙動を記述
          ledcWrite(0,60);
          delay(500);
          ledcWrite(0,40);
        }else{
          //オフのときのサーボの挙動を記述
          ledcWrite(0,25);
          delay(500);
          ledcWrite(0,40);
        }
    });

    // Callback to retrieve current state (for GetBinaryState queries)
    fauxmo.onGetState([](unsigned char device_id, const char * device_name) {
        return inputState == HIGH;
    });

    ledcSetup(0, 50, 10);  // 0ch 50 Hz 10bit resolution
    ledcAttachPin(SERVO, 0); // 15pin, 0ch
    ledcWrite(0,40);
}

void loop() {

    // Since fauxmoESP 2.0 the library uses the "compatibility" mode by
    // default, this means that it uses WiFiUdp class instead of AsyncUDP.
    // The later requires the Arduino Core for ESP8266 staging version
    // whilst the former works fine with current stable 2.3.0 version.
    // But, since it's not "async" anymore we have to manually poll for UDP
    // packets
    fauxmo.handle();

    static unsigned long last = millis();
    if (millis() - last > 5000) {
        last = millis();
        Serial.printf("[MAIN] Free heap: %d bytes\n", ESP.getFreeHeap());
    }

}
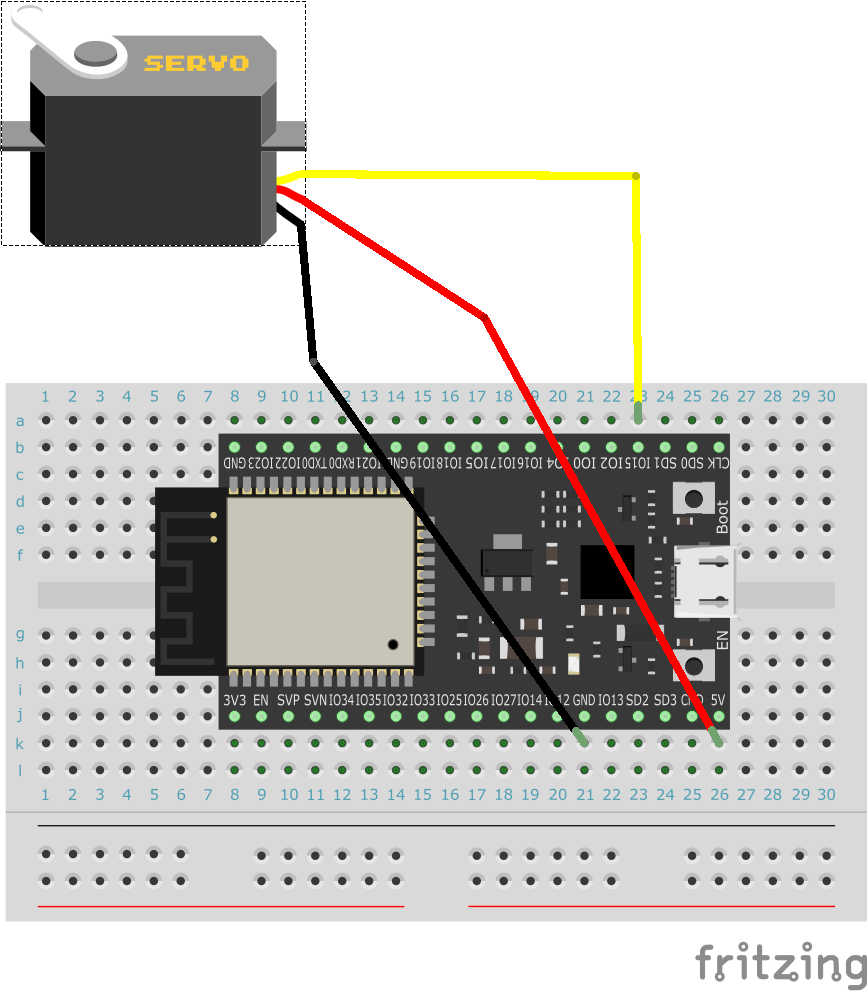
2 ESP32の接続例
スケッチにて指定したピンと電源とGNDのところに挿します。

3 Alexaアプリとの接続
前回の記事と同様に接続します。今回はボタンを押すとオン・オフに応じてサーボモータが指定した動きをします。
おわりに
ESP32とAlexaを連携して物理スイッチを制御する方法をご紹介しました。
かなり強引な方法ではありますが、音声やアプリから物理スイッチを制御できるようになると生活が便利になって良いですね。
おまけ
Amazon Echoのミュートボタンを音声でオンにする方法が分からなかったため、サーボモータを利用して音声操作で無理矢理押すようにしました。
Amazon Echoのマイクオフ機能を音声で操作する方法が分からなかったので操作できるようにしました#AmazonEcho pic.twitter.com/m4JxJ4rwsY
— クラクス (@kuracux) 2018年9月2日